Payment Web Application
Before you start please check Incoming Payment process flow with Payment Web Application:
Payment Web App description
Payment Web App is JavaScript React Web application build by us which encapsulates our Incoming payments API endpoints. Goal of the app is to keep you aside from the complexity of payment scenarios that vary depending on different Payment methods.
Key benefits are:
We maintain the changes in the Payment flows of various payment methods - list of supported payment methods with their description.
We are adding new Payment methods flows so when new payment method is available you can immediately offer it to the your Customers without any effort on your side.
To instantiate Payment Web App, only what you need to do is to:
obtain authorization token, see this section Get an authorization token to learn how to obtain the authorization token.
compile RedirectURL with necessary parameters, see this section Initial redirect to learn how to compile the RedirectURL.
redirect your Customer to this URL.
to learn more about every steps to be done in order to accept your payments using this Payment Web App you can go through the section - Payment process flow with Payment Web App of this page.
Payment Web App supports following scenarios which you can choose to use based on your preferences:
Scenario 1. Payment Web App flow - Payment app fully control the payment flow
Scenario 4. Payment Web App flow - Payment option is selected by Customer in Merchant system
When you are clear which scenarios you will use then follow the the section Payment process flow with Payment Web App of this page where you can find comprehensive information for every step of the Payment Web App flow.
Payment Web App scenarios description
Choose the scenario or more which fits your business needs.
Scenario 1. Payment Web App flow - Payment app fully control the payment flow
Payment Web App is instantiated only with minimum set of query parameters and our Payment App takes care about the rest as follows:
Offer payment methods to your Customer. The set of Payment methods to offer are displayed based on the payment method configuration in your Merchant’s account.
Guide your Customer through selection of the Payment method he can use to make a payment.
Collection of data from your Customer, we need to process and manage your Payment orders.
Guide your Customer through a payment flow of the selected Payment method.
https://payment.sandbox.aopay.io/?merchantCode=YOUR_MERCHANT_ID&idPayin=CHANGE-ME
&token=eyJhbGciOiJIUzI1NiIsInR5cCI6IkpXVCJ9.eyJvcGVyYXRpb25zIjpbIlBPU1QgLy4qIiwiR0VUIC8uKiJdLCJleHAiOjE2Mjk5MDA3MDcsImp0aSI6IjhlMzRjOWVo
&amount=1000¤cyCode=USD&callbackUrl=https%3A%2F%2Fwww.example.com%2Fcallback
&returnUrl=https%3A%2F%2Fwww.example.com%2Fcart
Scenario steps:
Customer requests a payment from Merchant system.
Merchant system obtains an authorization token for the particular Payment Order ID from our Platform.
Merchant system compiles RedirectURL with required-only parameters
Merchant system redirects user to our Payment Web App using RedirectURL
Payment Web App offers Customer to choose one from all your available Payment options -
POST /payins/!availablePaymentOptionsCustomer chooses one of the Payment option
Payment Web App collects the data from Customer, such as
accountName,emailAddressand so on, if there are any required to process the Payment. To check which data-points are required for given payment method seePOST /payins/{idPayin}endpoint request parameterpaymentMethodor check list of our supported payments method.Customer submits the Payment request to our Platform
Customer proceeds with his Payment and once completed he can return back to Merchant system through
returnUrlOnce Payment request is confirmed in our platform we send you a callback with your Merchant Order ID in
idPayinparameter.Merchant system obtains Payment request result with the detailed informations by our
GET /payins/{idPayin}endpoint.
Scenario 2. Payment Web App flow - Customer data, we need to process and manage your Payment orders, are collected by Merchant system
In this scenario Payment Web App does not collect data from your Customer and It expects that the data are provided with RedirectURL. If you wouldn’t like our Payment Web App to collect data from your Customer then you should follow this scenario.
Payment Web App is instantiated with query parameters which contain required payment request parameters and your customer data parameters. In this scenario Payment Web App does not collect the data from Customer neither Customer is able to modify them but they are submitted by Payment Web App to our platform with the payment request.
Scenario steps:
The same as in the case of scenario no. 1.
The same as in the case of scenario no. 1.
Merchant system compiles RedirectURL not only with required parameters but also includes the data from Customer. You can pass only required data-point or also optional ones. To check which your customer data data-points are required or optional for given payment method see request parameter
paymentMethodof thePOST /payins/{idPayin}endpoint or check list of our supported payments method.Payment Web App offers Customer to choose one from all your available Payment options -
POST /payins/!availablePaymentOptionsCustomer chooses one of the Payment option
Customer submits the Payment request to our Platform. Payment Web App submits also Customer data provided via RedirectURL
The same as step no. 9. in the case of scenario no. 1.
The same as step no. 10. in the case of scenario no. 1.
The same as step no. 11. in the case of scenario no. 1.
Scenario 3. Payment Web App flow - Customer data are collected by Merchant system but can be changed in the Payment Web App
Payment Web App is instantiated with query parameters which contain required payment request parameters, Customer data parameters and
allowCustomerDataChange parameter set to TRUE. In this scenario Payment Web App pre-fills provided Customer data and Customer
is able to modify them before they are submitted by Payment Web App to our platform with the payment request.
Scenario steps:
Customer requests a payment from merchant system.
Merchant system obtains an authorization token for the particular Payment Order ID from our platform.
Merchant system compiles RedirectURL with required parameters, possibly data from your Customer and in addition with parameter
allowCustomerDataChange=truewhich ensures that provided customer data are pre-filled in the Payment Web App and Customer can update it before he submits the Payment to our Platform.Payment Web App offers Customer to choose one from all your available Payment options -
POST /payins/!availablePaymentOptionsCustomer chooses one of the Payment option
Customer submits the Payment request to our Platform. Payment Web App also submits Customer data provided via RedirectURL.
The same as step no. 9. in the case of scenario no. 1.
The same as step no. 10. in the case of scenario no. 1.
The same as step no. 11. in the case of scenario no. 1.
Scenario 4. Payment Web App flow - Payment option is selected by Customer in Merchant system
In this scenario, Payment Web App skips Payment options selection step and guide your Customer through the flow of the provided Payment method. If you would like your Customer to choose the Payment option in your system then you should follow this scenario.
Payment Web App is instantiated with query parameters which contain required payment request parameters or/and customer data parameters
and paymentMethodCode parameter set with the payments method your Customer selected in your checkout process. It is possible also
to provide paymentOperatorCode as query parameter with the value of your customer’s bank or wallet in case that you want to collect which bank or wallet your
customers prefer.
Scenario steps:
Customer requests a payment from merchant system.
Merchant system obtains an authorization token for the particular Payment Order ID from our platform.
Merchant system compiles RedirectURL with required parameters, possibly data from Customer and in addition with parameter
paymentMethodCodeand/orpaymentOperatorCodewhich ensure that Payment Web App will not allow Customer to choose different Payment option. Provided Payment option needs to correspond with your available options (returned inPOST /payins/!availablePaymentOptionsresponse).Customer submits the Payment request to our Platform. Payment Web App also submits Customer data provided via RedirectURL.
The same as step no. 9. in the case of scenario no. 1.
The same as step no. 10. in the case of scenario no. 1.
The same as step no. 11. in the case of scenario no. 1.
Scenario 5. Payment Web App flow - Payment option is selected by Customer in Merchant system but can be changed in the Payment Web App
In this scenario, Payment Web App pre-selects provided Payment option but allows Customer to change it for different one, if there is any other available in your Merchant’s account configuration.
Payment Web App is instantiated with query parameters which contain required payment request parameters or/and customer data parameters
and paymentMethodCode parameter set with the payments method your Customer selected in your checkout process and in addition
with parameter optionsAvailable=true which ensures that Payment Web App offer Customer also your others Payment options.
It is possible also to provide paymentOperatorCode as query parameter with the value of the bank or wallet in case that You want to collect
which bank or wallet your customers prefer.
Scenario steps:
Customer requests a payment from merchant system.
Merchant system obtains an authorization token for the particular Payment Order ID from our platform
Merchant system compiles RedirectURL with required parameters, possibly data from Customer and in addition with parameter
paymentMethodCodeand/orpaymentOperatorCodewhich ensure that Payment Web App will not allow Customer to choose different Payment option.Customer submits the Payment request to our Platform. Payment Web App also submits Customer data provided via RedirectURL.
The same as step no. 9. in the case of scenario no. 1.
The same as step no. 10. in the case of scenario no. 1.
The same as step no. 11. in the case of scenario no. 1.
Payment process flow with Payment Web App
An overview of the steps to start accepting payments using our Payment Web Application:
Note
NEW
The easiest way to verify you merchant account is to use our Integration DEMO Web Application to make necessary API calls and check our Payment Web Application flow.
Initial redirect
To start the Payment Web Application you have to redirect your Customer to the Payment Web Application URL - RedirectURL. Your system has to be able to compile this RedirectURL (based on the your preferred scenario from above) and return it to your Customer user agent (browser etc.).
RedirectURL query parameters has to contain, at least required parameters as follows:
merchantCode- Your Merchant IDidPayin- Your Merchant Order IDtoken- The authorization token from the previous stepamount- Your Payment order amountcurrencyCode- Payment Order currencycallbackUrl- Your URL where we deliver a callback once Payment request status changedreturnUrl- URL to the page where we redirect your Customer after he completes the Payment
Note
To check the data format and validations of the RedirectURL query parameters see POST /payins/{idPayin} endpoint description
Full list of the RedirectURL query parameters with the description is listed bellow:
This functionality is here for documentation and demonstration purposes only. We expect that you will construct the URL in your system according to this example, or you will use the corresponding method in SDK.
Note
To generate some RedirectURL examples,
choose Sandbox or Production domain of the Payment Web App URL in the Servers dropdown list
modify default values for each parameter
press the Execute button in the bottom part of the blue box.
It will display the redirect URL with query parameters filled in.
Payment options
After being redirected to the Payment Web Application and provided that You allow Customer to choose Payment option, the customer is guided to select from the Payment options to send the funds. In case of the Scenario 4. Payment Web App flow - Payment option is selected by Customer in Merchant system scenario this step is skipped.
Sample of the Payment Web App Payment Options screen for IDR payments:
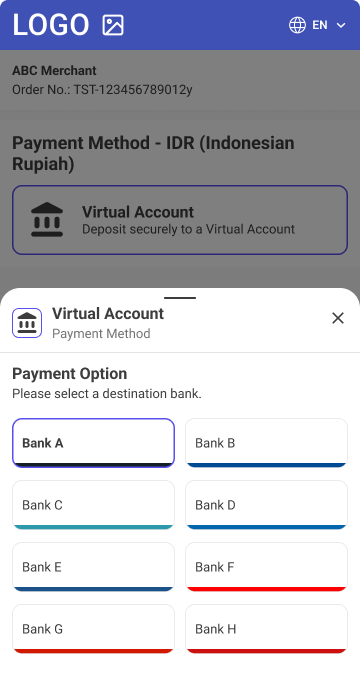
Useful links for this step
where to see the Payment options you have configured in your Sandbox or Live account - Login into your Merchant Back-office Sandbox or Live account account and check your page.
Where to get the Payment options and theirs configuration via API - Use
POST /payins/!availablePaymentOptionsendpoint
Submit Payment
When the Payment option is chosen then the customer has to submit the payment to the Platform. It depends on the selected Payment option and your preferences whether the Customer can enter or modify his data before submitting the Payment. As You know from above in this scenario - Scenario 2. Payment Web App flow - Customer data, we need to process and manage your Payment orders, are collected by Merchant system the customer data collection is skipped.
As the Payment Web Application is integrated directly to our platform there is no API call needed from your side to submit the payment.
Useful links for this step
where to see Payment methods Payment Web App UI flow - check Payment methods of this page
where to see the your Payment orders in your Sandbox or Live account - Login into your Merchant Back-office Sandbox or Live account account and check your .
Complete Payment
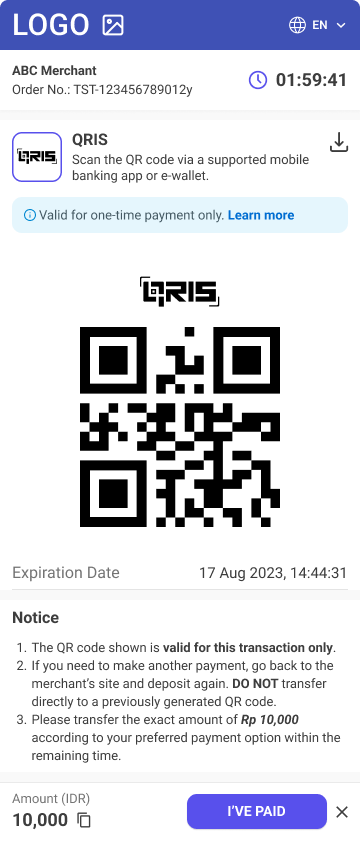
Once the payment is submitted then the Customer has to complete the payment.
The actions which the customer needs to perform depends on the Payment option he chose. In general we can say that there are two types of flows how to complete the payment implemented in Payment Web App. In one case we redirect your customer to his payment institution such as banks or wallets depending on the chosen Payment methods as example here It can be Instant Bank Transfer. In second case we show customer payment instructions in form of QR code of payment transfer instructions with guidelines how to complete the transfer of funds. The page we display depends on chosen Payment methods as example here it can be Offline Bank Transfer or UPI.
For some of the Payment methods your customer is required to provide us with external payment reference.
Useful links for this step
where to see Payment methods Payment Web App UI flow - check Payment methods on this page
where to see the your Payment orders in your Sandbox or Live account - Login into your Merchant Back-office Sandbox or Live account account and check your .
How You can find out whether payment has been processed on not - check Callback and Get payment status step.
Payment status and Return to Your website
After your customer completes the payment, either upon payment’s status change or after he confirms payment completion in Payment Web App, customer is presented with Payment Status page with option to return to the merchant website, specifically to the returnUrl you provided in the RedirectURL which instantiated our the Payment Web App.
Payment confirmation |
Payment status validation |
Payment status & Return to your website |
|---|---|---|
|
|
|


Payment status page in Payment Web Application can still be opened later to present status of payment to customer on Payment Status URL. Payment Status URL is available under the same domain as RedirectURL under /status path.
Payment Status URL query parameters have to contain following parameters:
idPayin- Your Merchant Order IDtoken- The authorization token with proper scope - to obtain detail of paymentcurrencyCode- Payment Order currency
Callback and Get payment status
After the customer completes the payment It takes us a couple of minutes to validate whether Payment has been processed and funds transferred or not.
When the payment process is finished, no matter if successfully or not, then the merchant is automatically notified about a change of the payment status via the callback.
Based on this event, the merchant has to obtain Payment status via our API to get the result of the payment process. It can be obtained at any time before or after.
Useful links for this step
where to find information about Callback request - go to the documentation of
POST /payins/{idPayin}endpoint and open Callbacks tab in the endpoint header descriptionwhere to find information about obtaining payment status - go to the description here